
Previous Tutorials:
- Unity Core Concepts (Official Unity Tutorial)
- Unity installed
- Unity account created
- Familiarity with basics (GameObjects, Components, Play Button, etc)
- Unity Project and Version Control Setup
- Unity project created
Concept: What is a script?
A Unity script is a special type of Component. Like the built in components in Unity such as the Sprite Renderer or Rigidbody, scripts can have settings and behaviour. However, in the case of scripts, you can define all of the settings and behaviour yourself using code.
Scripts in Unity use the C# programming language. This tutorial will introduce the basics of how a Unity script is set up, and more detail will be provided later.
Step 1 – Open your Unity project
Step 2 – In the Project window, create a new Scripts folder
You can create new files and folders by right-clicking in the Project window, then choosing Create, and finally selecting the type of file you would like to create (in this case, a folder).

Step 3 – Inside the new folder, create a new C# script
Create a C# script in the same way that you created the folder. You should name your script right away – for this script, let’s call it TestScript.

When naming scripts, you must follow these naming conventions:
- Never use spaces (the script won’t work)
- Use a capital letter at the start, then lower case letters
- For multiple words, capitalize each new word’s first letter – this is called PascalCase.
If you forget to name it right away, you’ll need to change the name twice – once for the file, and once for the class name inside the script (see Step 4).
Step 4 – Examine the script and identify each area
Open up the script. This will open Visual Studio. You can create a free account if you don’t already have one (Fife College students will have one as part of your college account), or you can use it without an account. Visual Studio is a type of program called an IDE – Integrated Development Environment. These programs are designed to help you write code easily – like Word, but for code writing!

When the script opens, you will see it already has some code inside it. This basic code is put there by Unity to make writing your first script easier. There are several main regions of the script – see the image above for details.

First, you have the “using” statements at the top. These are needed when you use special functionality from Unity or other sources. You can ignore them for now.

Second you’ll see that most of the script is enclosed in curly braces { }
Curly braces, in C# programming, are like containers. They indicate a group of code that is related. In this case, the curly braces are around something called a class. Every script has a class inside it, which holds the functionality for that script. Your script file name and the class name have to match exactly, or the script won’t work! This includes upper and lower case differences, too.

Inside the class, you will see two other bits of code – one with the word Start and one with the word Update, both followed by parentheses ( )
These are called functions. In Unity scripting, functions are like batches of commands – somewhat like a recipe the game should follow. These are two special functions built in to Unity. Start() happens once when the GameObject the script is attached to is created. Update() repeats every frame – roughly 60 times per second!
Step 5 – Add a debug log in the Start() function
Let’s write our first code to see how these functions work. Add a new line inside the curly braces surrounding the Start() function. It is important to remember that curly braces are used to show groupings in the code – if we want our code to be part of the Start() function, it needs to be inside that function’s curly braces!
On the new line, add the following text:
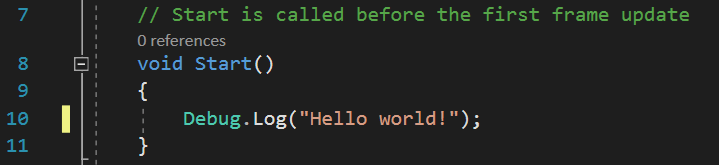
This code will make whatever is in the quotes print to the debug console. You can use whatever you like inside the quotes – make your program say something silly or interesting if you like!

WARNING
Computers are VERY picky, Make sure your capitalisation and spelling are exactly as the picture shows, or your code will not work. It’s important to practice this and always keep it in mind!
Step 6 – Save the script
In order to actually see the results of our script, we have to save it. A script won’t run if it isn’t saved – or rather, the older, saved version of the script will run.


HINT
You can always tell if a file isn’t saved in Visual Studio by seeing the asterisk * in the file name. This will also occur with Unity scene names!
Save it now so we can try it out!
Step 7 – Create a GameObject in the Unity scene
Back in Unity, it’s time to run our script. However, a script in the project folder will never be run on its own. In order to run, it has to be attached to a GameObject in the scene.

Create an empty GameObject in the scene by right-clicking in the Hierarchy window and choosing “Create Empty”. Rename your new object to something like “Test Object”.
Step 8 – Attach the script to the GameObject
Once you have created your GameObject, you can attach the script to it by dragging the script from the project file onto the GameObject in the Hierarchy, or by clicking on the GameObject and clicking the “Add Component” button in the Inspector, then typing in the script name or browsing to it using the menu.

Step 9 – Run the game to test the script
With the script attached, you are finally ready to try it out! Click the Play button up at the top of the screen.
At first, you might not notice anything. Your debug text will be printing to the Console window, but this might not be visible in Unity. You can add it to your Unity setup by going to the menu at the top of the screen and choosing Window > General > Console. Attach this window somewhere on the screen where you won’t lose it – you’ll need it often when programming.

Once your Console window is visible, run the game again and you should see your text script print to the console window!
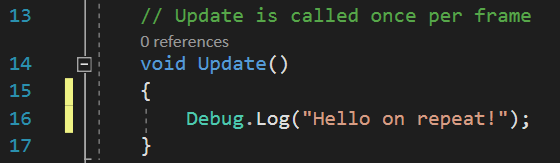
Step 10 – Add a debug log in the Update() function
The debug log we just saw was executed in the Start() script. We saw it appear only once. That is because the Start function happens only once when the script is first loaded – this usually happens when the GameObject is first loaded into the scene – usually when we first press play.

CHALLENGE
Add a new debug log, this time in the Update() function. That will cause the log to occur once every frame, instead of only once. Try doing this on your own, based on the debug log in the Start() function.
Step 11 – Save the script
Step 12 – Run the game to test the script
You should not need to change anything in Unity – just press the Play button and see what happens!
HINT
That’s a bit spammy! To make it more readable, click the “Collapse” button on the Console window to combine repeat debug messages into a single message with a counter showing the number of messages.
Step 13 – Add public variables for text
Our new script is fun, but every time we want to change what the text says, we have to open up the code. This isn’t ideal! Instead, we can save the message we want to print in a variable in the script.
Variables are like containers for data. Each variable can contain only a specific type of data, so a variable designed to hold a number can’t hold text, and vice versa.
We can create a variable in our script by adding it at the top of the class. Add a new line before the Start() function, and on the line, write the following:

What does this mean? Lets break it down:
- public – this means the variable can be edited by other scripts, and importantly, can be seen in the Unity editor.
- string – this means the variable can only contain text
- myStartMessage – this is the name we are giving the variable, kind of like a label on the outside of a box. We can refer to it by this label later.
- ; – the semicolon indicates the end of a line of code, and is needed after most code statements.
The variable has been declared, but has not been used yet. Down in your Start() function where you currently are using the Debug.Log() function to print out code, remove the text inside the quotes, and the quotes themselves, and replace it with the variable name.

Why remove the quotes? Things in quotes will be printed exactly, without working any code out. This means if we put “myStartMessage”, that is what would be shown in the console – the word “myStartMessage” – NOT what was contained inside the variable (the actual message we want to print).
Step 14 – Edit the variable value in the editor
Now that your variable is on the script, you should be able to see it and edit it in the Unity editor. Click on your test GameObject and you should see a “My Message” field in the inspector. Write something new there, different from the message you used before.
Step 15 – Run the game to test
When you run the game, you should see the new message printed.
CHALLENGE
Add another public variable to contain a message for the Update() debug log, then use it in the same way. Make sure to enter in a different message into Unity so you can see a difference if it actually works!
Conclusion
You have now learned how to create scripts, use the Start() and Update() functions, print Debug Logs, and use public variables to make information editable in Unity. While the scripts we did in this tutorial won’t do anything useful in a game, the skills you learned have prepared you to take on more substantial tutorials.
Further Reading
- Beginner Scripting Tutorials
